


If you have a website or blog, then it needs graphics. Blogs with nothing but text are BORING. People like visual stimulation along with the words, and if you want to have some monetization that isn’t pulling images from an ad network, like maybe your own affiliate or other offers, then you will need to know how to create your own stuff. (or pay someone like me to do it)
Let’s get started.

Creating Your Own Blog and Website Graphics is EASY
Okay, all that you need to have is a decent image editing or design application and a source of royalty free images as raw material.
For the images, I use Pixabay.com, but you can use anything, even a stock image site but from there you will have to buy the images. Pixabay is limited but a great source. It claims its images are Creative Commons and free to use, even for commercial purposes, but I suggest running images through Google’s image checker to see if there are copyright to them. This is because sometimes some lowlife ads a copyrighted image as if it’s theirs to contribute, and the site doesn’t always catch it, but you’re mostly good with Pixabay.
Go to Google Images and click the camera icon to bring up the URL box.


Enter the URL of the image that you want to check and Google will show you where it’s found. It can be found in plenty of places if people have used it, and that’s fine, but look for an ownership claim, which it’s pretty obvious if it’s found on an artist’s site.
Below, I put in an image path to an online photo of the famous U2 singer, Bono, and you can see the Google results. It’s obviously an image with copyright. It even offers visually similar images below.

There is a debate out there of how much you can change a copyrighted image for it to become okay to use, so use your judgement I guess.
So, stick with an image archive that claims Creative Commons license, and check the images with Google to be sure.
Use the images within your own creations. Collage them, alter them, change the colors, etc.
Be creative!
Photo, Image, and Design Applications
For the applications, I have a MacBook and I prefer Serif Affinity (affiliate link coming soon!) Designer and Affinity Photo, which are analogous to Adobe Illustrator and Photoshop. Of course the Adobe ones are massive behemoths, but they cost A LOT, and that’s only for a subscription. They make you RENT the software.
Boo! Adobe. Boo! Phooey on you!
Affinity is $40-$50 each, one time, free updates. (yay!)
Serif is working on Affinity Publisher and also an Adobe Litebox competitor! (yay again!)
These are available for PC or Mac, but the licenses are not transferrable, so if you buy the Mac or PC version, that is the one you have. You can’t buy for PC and then have it install on Mac. There is no license key, at least for the mac version, which is bought and installed through the App Store. You can download a 2 week trial from their website, but the paid for version comes through the Apple App Store. There are even IOS iPad versions as well!
Windows versions can be bought and downloaded directly from Serif.
This is powerful and easy to use software, and I have just scratched the surface myself. (and created some dope stuff, too!)
The Adobe snobs and online trolls put forth all of the reasons why they cannot (or will not) switch from Adobe. Hey, I just want to get my stuff done and the Affinity applications are what I use and I LOVE them. I could care less about the Adobe products.
You can do most of this stuff even on the freest of apps, like Paint.net (Windows) or the GIMP. (multi platform open source software – even on Linux!)
There are TONS of free and nearly free apps to choose from.
Graphics Sizes
You must decide what you want to create and what are the pixel dimensions. Is it an ad, a Pinterest picture, a t-shirt design, various banner ad sizes, or a Facebook banner?
Once you look up the proper dimensions on the net, you plug that into the software when you are creating a new document.
From there its just learning and knowing the tools for your particular program.
I have made t-shirt designs and banners on a PC with Paint.net as well. It’s harder than with the Affinity apps, mainly because you have to create each layer yourself, but it’s not too hard.
I love Affinity Designer because the text tool can snap text to a shape as a text path, and you can have text follow these weird paths instead of just a line.
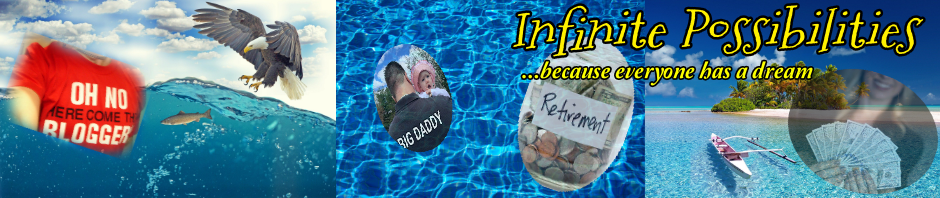
See some of what I mean here.

I made that in literally a few minutes with Pixabay and Affinity Designer. For a pure sample that I threw together in a few minutes to demonstrate cutouts, text paths, and text effects like 3D, I think it’s pretty darn good.
Here is a video of me creating a Coinbase banner ad.
That was pretty easy, and no one has the ads that YOU create for your own sites!
Once you know how to create these things, the sky is the limit.
I can help with small jobs via my Fiverr gigs, in case you just can’t figure it out for yourself, which is cool too.
Here I am creating some kids holiday t-shirt iron on designs.
Here I am creating a quick and dirty website banner, just for demonstration purposes.
Take a look around my blog because I do the graphics pretty much myself, this way.
I hope that this has either inspired you to take a shot at creating your own website graphics, or hiring me to do some for you!
Drop a non spam comment below. (spam comments never make it and go straight to trash so don’t waste your time, comment spammers)


